

A perfectly tiled wall or floor is not just about choosing the right tile—it’s also about precision and alignment. Whether you are renovating your kitchen, bathroom, or creating a feature wall, knowing what is a tile spacer is essential for achieving professional results.
What is a Tile Spacer?
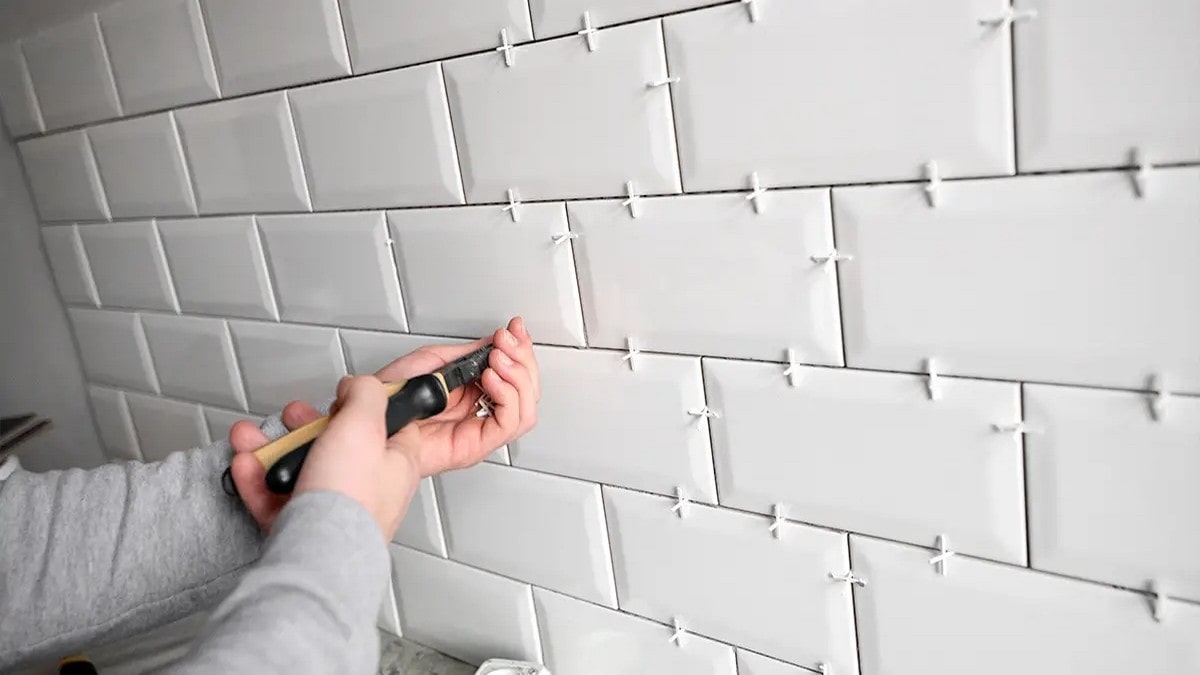
Perfectly aligned tiles make any renovation project look professional and polished. But achieving this symmetry is impossible without the right tools, and that’s where a tile spacer comes in.
Tile spacers are small plastic devices placed between tiles during installation to ensure even gaps for grouting. They may seem minor, but they are essential for a flawless finish.
Types of Tile Spacers and Their Uses
Tile spacers come in various shapes, sizes, and materials, each designed for specific applications. Understanding their differences ensures precise installation:
| Spacer Type | Ideal Use | Size Options |
|---|---|---|
| Cross-shaped | Standard wall or floor tiles | 1mm–5mm |
| T-shaped | Corners and specialty layouts | 1mm–5mm |
| Wedge | Adjustable for unique spacing needs | Flexible |
| Clip or leveling | Large format tiles or uneven surfaces | Variable |
Tip: For DIY enthusiasts, starting with standard cross-shaped spacers for walls and floors is the easiest approach. Professionals often use clip spacers for large tiles to prevent lippage and ensure a perfectly flat surface.
How to Use a Tile Spacer Properly
-
Position Spacers Correctly: Place the spacer at each corner where tiles meet.
-
Check Alignment Frequently: Use a level to ensure straight rows.
-
Maintain Consistency: Consistent spacing avoids crooked lines.
-
Remove Timely: Most spacers should be removed after the adhesive partially sets.
Using spacers correctly reduces errors and prevents common renovation mistakes that many homeowners make during tiling projects.
Choosing the Right Size Spacer
Tile spacers also determine grout line width, which impacts both aesthetics and durability.
Guidelines for Melbourne Homes:
-
Walls: Minimum 2mm
-
Floors: Minimum 3mm
-
Large tiles: 4–5mm for stability
Pro Tip: If installing Natural Stone Look Tiles, choose spacers that don’t damage the surface texture or finish.
DIY vs Professional Use
Even if you are a DIY enthusiast, tile spacers make your project manageable and professional-looking. For professional installers, spacers are indispensable, especially for:
-
Large-format tiles
-
Complex mosaics
-
Curved walls using Tiles for Curved Walls
-
Custom patterned designs
Common Mistakes When Using Tile Spacers
-
Incorrect Size: Using spacers too small or large for the tile size.
-
Improper Placement: Not placing at every junction, causing uneven grout lines.
-
Leaving Spacers During Grouting: Can result in sticky residue or difficulty applying grout.
-
Ignoring Expansion Needs: Particularly relevant for outdoor tiling or sunny Melbourne rooms.
Avoiding these mistakes ensures a polished, long-lasting finish.
Creative Applications of Tile Spacers
Tile spacers aren’t just functional—they also allow for creative designs:
-
Accent Walls: Use consistent spacing for patterned feature walls.
-
Backsplashes: Maintain perfect alignment around cabinets and appliances.
-
Outdoor Patios: Proper spacing helps with expansion and prevents cracking.
-
Eco-Friendly Projects: Even Recycled Tiles benefit from correct spacing for alignment and durability.
Tip: Experimenting with spacer sizes can create intentional design effects, such as alternating grout widths for visual texture.
Special Considerations for Curved or Unique Tiles
Installing tiles on curved surfaces or unique layouts requires flexible techniques:
-
Curved Walls: Using Tiles for Curved Walls with wedge spacers allows tiles to follow the contour smoothly.
-
Irregular Tiles: Uneven edges may need adjustable spacers for consistent grout lines.
-
Large Surfaces: Ensure that large wall or floor areas are properly leveled before placing spacers to avoid cumulative errors.
Choosing the Right Material and Type of Tile Spacers
Tile spacers come in different materials:
-
Plastic: Most common, affordable, and disposable.
-
Rubber: Flexible, ideal for curved or uneven surfaces.
-
Metal/Professional Leveling Spacers: Reusable, perfect for large-format tiles and commercial installations.
Selecting the right material ensures long-term reliability and prevents damage to delicate tiles like Natural Stone Look Tiles or recycled surfaces.

Tips for Melbourne Homeowners
-
Climate Awareness: Melbourne weather can cause minor expansion; leave proper grout space.
-
Professional Installation: For kitchens, bathrooms, and feature walls, hiring experts ensures proper spacer use.
-
Tile Selection: Certain tiles like Recycled Tiles may have minor size variations; spacers accommodate these differences.
-
Tool Maintenance: Keep spacers clean and free from adhesive for repeated use.
Advanced Tips for Flawless Tiling
-
Plan your layout carefully to minimize cuts.
-
Consider visual lines when aligning tiles in high-visibility areas.
-
Use consistent spacing to highlight patterns or color contrasts.
-
Test on a small section before full-scale installation.
These techniques help both DIYers and professionals create precise, eye-catching results.
Conclusion
Understanding what is a tile spacer is fundamental to successful tiling projects. Whether you’re installing floor tiles, wall tiles, or creative layouts, spacers ensure precise alignment, consistent grout lines, and a professional finish. Incorporating them into projects that use Tiles for Curved Walls, Recycled Tiles, or Natural Stone Look Tiles makes even challenging installations manageable. Avoid common renovation mistakes by planning layouts carefully, choosing the right spacer type, and consulting Melbourne tiling professionals when necessary.
With proper use, a simple tool like a tile spacer can elevate your DIY or professional tiling project, transforming your space into a polished and durable masterpiece.