
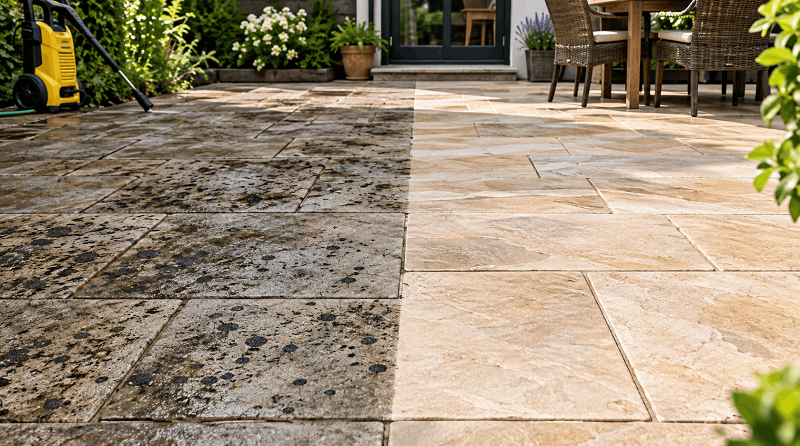
You have washed the patio, cleared away the dirt and rinsed every slab, yet the same black dots are still there. Before making another pass with the pressure washer, check what those marks actually are. Stubborn black spots on paving are often lichen, although leaf stains, mould and other deposits can look similar.
If you are wondering how to get rid of black spots on patio slabs, start by identifying the surface and choosing a treatment approved for it. Established lichen often needs a targeted cleaner rather than more forceful scrubbing. The aim is to remove the growth while protecting the slab’s colour, finish and joints.
What Are the Black Spots on Your Patio Slabs?
Lichen grows where a fungus lives together with an alga or cyanobacterium. On paving, it can form tightly attached patches that ordinary washing struggles to remove. Porous stone and areas that remain damp or shaded are common places to find it.
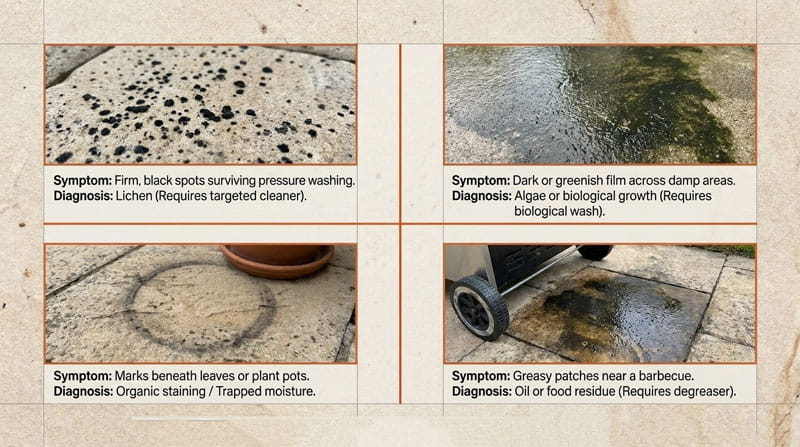
However, appearance alone does not confirm the cause. Check the pattern, location and response to gentle cleaning:
- Small, firmly attached spots that survive washing: lichen is a likely explanation.
- Dark or greenish films across damp areas: algae or other biological growth may be involved.
- Marks beneath fallen leaves or plant pots: organic staining or trapped moisture may be contributing.
- Greasy patches near a barbecue: oil or food residue needs a different cleaning approach.
- Dark marks that follow the stone’s natural pattern: these may be part of the material rather than removable staining.
Try a compatible mild cleaner on a small area first. If the surrounding dirt lifts but the spots stay in place, move on to identifying a suitable stain or biological-growth treatment.
Choose a Cleaning Method That Suits Your Patio Material
A cleaner suitable for concrete is not automatically suitable for limestone, coloured paving or a sealed stone surface. Check the paving supplier’s care instructions before buying a black spot remover.
| Patio material | Sensible starting point | What to check before stronger treatment |
|---|---|---|
| Sandstone | A neutral stone cleaner for loose dirt, followed by an approved lichen treatment if needed | Compatibility with the stone’s colour, finish and existing sealer |
| Limestone or travertine | A non-acidic cleaner approved for that stone | Avoid vinegar and acidic patio cleaners, which can etch these materials |
| Concrete paving | A paving cleaner suitable for the particular concrete finish | Whether the slabs are coloured, coated or sealed |
| Porcelain paving | A cleaner suitable for exterior porcelain and its joints | Surface texture, grout compatibility and any protective coating |
| Unknown or previously sealed slabs | Supplier advice and a small test area | Identify the material and coating before applying a strong cleaner |
The Natural Stone Institute advises choosing cleaning products according to the stone’s composition. It specifically warns that vinegar and other acidic products can dull or etch calcium-based stones. For everyday dirt removal before treating the spots, follow our guide to how to clean outdoor tiles.
What to Check Before Applying a Black Spot Remover
Prepare the area before opening the treatment. This helps you work evenly and prevents splashes from reaching furniture, plants or nearby finishes.
- Move furniture, pots and loose objects away.
- Check for cracked slabs, loose tiles and damaged joints.
- Read the product label and safety instructions, including its surface restrictions.
- Wear the specified gloves, eye protection and other protective equipment.
- Plan how to contain or manage runoff according to the product instructions.
- Keep treatment away from ponds and prevent contact with nearby surfaces that it may damage.
- Choose weather conditions within the product’s stated requirements.
- Test an inconspicuous area and assess it after the required treatment, rinsing and drying period.
Never mix a black spot treatment with another cleaner. Sodium-hypochlorite products can release toxic gas when they contact acids. Keep children and pets away for the period specified by the manufacturer.
How to Get Rid of Black Spots on Patio Slabs: Step by Step
1. Sweep Away Debris and Clean Loose Surface Dirt
Remove leaves, soil and loose debris with a broom. If needed, wash away general dirt using a cleaner compatible with the paving. This preliminary clean helps expose the remaining marks. Rinse away any earlier cleaning product as directed before using a separate treatment, and follow the new product’s requirements for a dry or damp surface.
2. Apply a Treatment Approved for the Slabs
Choose a product that explicitly lists your paving material and the type of growth you are treating. A general patio detergent may remove dirt without dealing with established lichen. Apply the treatment at the stated coverage and concentration. Ready-to-use products and concentrates have different instructions; do not borrow a dilution ratio from another brand.
Treat the area specified by the manufacturer. On visibly weathered paving, cleaning a tiny spot may leave a contrast with the surrounding dirt, so use the test area to assess how the finished surface will look.
3. Follow the Contact Time and Scrubbing Instructions
Give the treatment the time stated on its label. Washing it away too early may reduce its effectiveness. If brushing is required, use the recommended brush type and pressure. Avoid scraping the marks with metal tools or repeatedly grinding away at the slab’s surface. There is no universal waiting time. Some products are designed for treatment and rinsing within hours; others remain on the surface and rely on weathering to remove dead growth gradually.
4. Rinse or Leave the Treatment as Directed
For a rinse-off cleaner, remove residues using the method specified on the label. Manage the wash water so it does not contaminate ponds, planting or other sensitive areas. For a leave-on treatment, follow its weather and aftercare instructions. Do not assume every black spot remover needs immediate hosing.
5. Let the Slabs Dry and Assess the Result
Judge the colour once the surface has dried. Wet paving can hide remaining marks and make cleaned areas look darker. If spots remain, check the expected results period before repeating treatment. Reapply only when the manufacturer permits it. Increasing concentration or applying several different cleaners can damage the surface without solving the underlying problem.
Can You Remove Black Spots Without a Pressure Washer?
Yes. Some treatments can be applied with suitable hand equipment and either rinsed with a hose or left to work, depending on their instructions. A pressure washer is not a requirement for every method. A pressure washer can help remove general grime and loosened deposits, but persistent black spots may survive it. Repeatedly directing a concentrated jet at the same mark risks damaging softer paving or disturbing joints.
If the paving is sound: use pressure cleaning only when the paving and jointing manufacturers allow it. Follow their guidance on nozzle, distance and operating pressure. If the surface or joints are deteriorating: stop pressure cleaning and arrange an assessment. Cleaning should not leave loose joint material, eroded patches or newly exposed damage.
Do Bleach, Vinegar or Baking Soda Work on Black Spots?
Household remedies are easy to find, but their suitability depends on both the stain and the paving. “Natural” does not mean safe for every stone.
| Method | What it may do | Main limitation |
|---|---|---|
| Mild detergent or neutral stone cleaner | Remove loose dirt and some surface contamination | Usually insufficient for firmly established lichen |
| Household bleach | Affect some biological growth | Suitability, strength and contact time vary; it may affect finishes, colour or nearby planting |
| Vinegar | Act as an acidic cleaner on certain deposits | Can etch limestone, travertine and other acid-sensitive stone |
| Baking soda | Help with some cleaning tasks through mild abrasion | Not a reliable treatment for established patio lichen |
| Dedicated black spot or lichen treatment | Target the growth described on its label | Still requires material compatibility, correct application and realistic waiting time |
Some purpose-made black spot removers contain sodium hypochlorite, but that does not make household bleach an interchangeable substitute. Use a product with instructions for your surface rather than creating a stronger mixture yourself. Avoid vinegar on acid-sensitive natural stone. Mixing it with baking soda does not turn it into a proven lichen remover.
What If the Black Spots Remain After Cleaning?
First, check whether the treatment is supposed to produce an immediate result. A weathering-based product may need months to clear heavy lichen; lack of an instant colour change does not necessarily mean it has failed. If the stated treatment period has passed, reconsider the diagnosis. A remaining mark could be residual staining, oil, a mineral deposit, an old coating or a natural feature of the slab. Each needs a different response.
Also examine the surface itself. A pale, rough or dull patch may indicate damage rather than dirt. Stop experimenting if the finish changes, and ask the paving supplier or a stone-care specialist to assess it. Cleaning can reveal colour hidden beneath contamination, but it cannot guarantee a return to the original appearance. Permanent staining, weathering and previous cleaning damage may remain.
How to Stop Black Spots Coming Back
After removal, focus on conditions that allow the patio to stay dirty or damp:
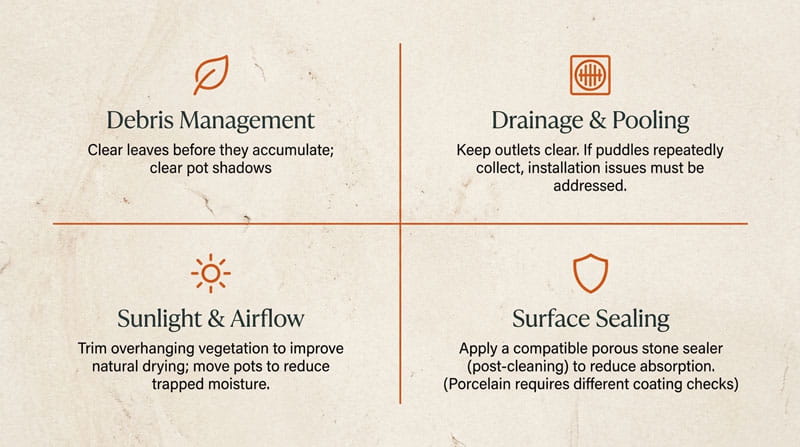
- Clear leaves before they accumulate. Pay attention to corners, edges and areas beneath furniture.
- Keep drains and outlets clear. Note where water remains after rainfall.
- Reduce trapped moisture. Move pots occasionally and clear debris from beneath them.
- Improve drying where practical. Trim overhanging vegetation without creating other problems for the garden.
- Inspect the paving regularly. Address new growth before it becomes widespread.
- Maintain the joints. Have loose or damaged jointing checked rather than repeatedly washing material out.
If puddles repeatedly collect in the same places, cleaning alone will not correct the drainage. Our outdoor tiling tips explain the installation issues to consider.
A compatible sealer may help reduce absorption and make maintenance easier on some porous surfaces. It does not remove existing growth or guarantee that black spots will never return. Ask the supplier whether sealing is appropriate, and apply it only after the surface has been properly cleaned and dried.
Porcelain paving does not automatically need the same sealing treatment as porous stone. Check the tile, grout and coating requirements separately.
For ongoing care, see our tips for maintaining and cleaning tiles, or browse the Maintenance & Repair guides.
When Should You Get Professional Help?
Get advice before further treatment if you cannot identify the slab material, the test patch changes colour, or the surface starts to roughen. A paving-cleaning or stone-restoration specialist can assess stubborn stains and suitable treatment options. Loose tiles, crumbling joints and persistent water pooling need an installation assessment. If your Melbourne patio requires repair or retiling, explore TileUnique’s residential tiling services to discuss the work required. Replacement should follow an assessment of the damage and its cause. If replacement is necessary, our outdoor patio tile ideas can help you compare finishes and layouts.
Conclusion
The best way to get rid of black spots on patio slabs is to identify the marks, confirm the paving material and use a compatible treatment exactly as directed. Clean loose dirt first, test a small area and allow the full treatment period before judging the result. Once the spots have cleared, keep leaves and drainage under control. If marks remain or the finish changes, get the surface assessed before applying stronger chemicals or more pressure.